30.3.17

OTA balance point, lens cleaning and gloves.

 *

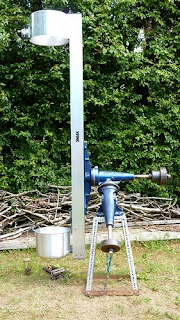
To ensure I had the OTA's middle, balance point I really had to fit the lens to its long 8" diameter tube. I had been using G-cramps [C-clamps] placed radially to simulate the weight of the heavy lens in its cell. My digital luggage scales suggested the clamps matched the lens for weight but I was mistaken. 

The lens looked so filthy with collected dust and dried dew that I decided to give it a clean in its cell. I used a rubber bulb, lens, dust blower first. Followed by a gentle brushing with a large, natural bristle make-up brush bought for this precise purpose and no other. The brush is kept in a tube to avoid contamination between uses. More blowing followed, then further brushing with lens cleaning solution added this time. Once I could see no visible residue of dust a wipe with a moist lens tissue followed. A final gentle drying with a well washed microfiber lens cloth completed the task. The bulb lens blower was used repeatedly to help lift any loose particles of dust.

The cleaning was repeated for each side, at each step, to avoid contaminating the second surface with dirty materials or tools. The lens looked fine after another blowing with the lens bulb to evaporate the last remaining film of lens cleaning solution. Though camera flash still revealed an invisible streaking in places. The cleaning materials and tools are then carefully washed and rinsed, dried and then stored in sealed containers until the next [rare] use. No telescope optics should be cleaned any more than absolutely necessary. Even when very dusty they won't show any clearly visible degradation of the image.

-------------------------------------------------------

Thanks to the second balance weight the C of G is now within a centimeter of the center of the huge, main tube. I checked the balance by rolling the OTA [see-saw style] back and forth on a thin steel rod to act as a fulcrum on the workbench. I discovered, years ago, that a larger diameter rod would tip the OTA far too much each way making balancing far too clumsy and slow. Twirling the 1/8" rod slowly with the fingers ensures the telescope tube isn't joggled. A larger wheel would help provide slow motion but I haven't gone that far yet. As the big tube gently finds its own balance point it became more ponderous in its up and down movements. I then marked the tube with adhesive electrical tape for easy registration with the tube rings and Dec axis when it is re-mounted.

Guessing the balance point is very amateurish. A large, long and heavy OTA can easily damage itself badly. Particularly  if it is very nose heavy and swings wildly on the mounting! Be warned: Many refractors are very nose heavy! 

I always wear industrial rubber gloves for a really safe grip when handling my telescopes. The gloves provide a hugely increased degree of safety and extra insurance against dropping anything. Where bare hands could easily lose the plot for want of a secure hold. I came close to disaster a couple of times before learning this valuable lesson. I now keep gloves just inside the door to give me no excuse for not wearing them. The savings in energy from not having to grip so hard makes them valuable on repetitive tasks. Or where something heavy, or awkward, must be carried a long way.

In the past rubber gloves were of one type. Thick, stiff and heavy canvas with a rather slippery, but initially waterproof PVC[?] surface form dipping. Nowadays a modern, matt glove has an almost sponge-like coating for really extraordinary grip. You can never have enough pairs of gloves "handy" for different jobs. The thinner ones are used by mechanics for handling fine jobs like bicycle repair. The hours saved, in not having to scrub one's hands clean after every job, is well worth the cost. Not to mention the damage to one's skin from endlessly using harsh hand cleaning materials. Prices vary enormously for very similar looking gloves so look around and get something you like and which fit you perfectly. There is no excuse these days for ill-fitting gloves. Loose gloves are worse than those which are too tight. Snugly fitting, without wrinkles or noticeable compression, are best. Try them all on before purchase and look for different weights of glove for different tasks. I even have a box of 100 disposable, surgical gloves which are absolutely superb for cycle repair. Though not long last enough for professional use.  

For balancing I use a folding B&D workbench with four widely spaced, large, plastic press-in blocks to ensure the telescope tube cannot possibly roll off. If an OTA did roll off it would be an absolute disaster! With the delicate glass objective very likely to be cracked by the sudden impact with the floor or ground. Never lay any OTA, of any size, on a flat surface and expect it to stay there! Not even for the briefest moment! I saw an antique refractor roll off a sideboard in my youth and crack the irreplaceable lens. I never want to see that ever happen again!

I stand the huge OTA on its nose. [i.e. On its stumpy, 8" permanent dewshield.] With a thick disk of 1.5" plywood made to fit its 10" diameter perfectly with a lip to allow easy removal. The disk is its secure footwear and it must never fall out during lifting. So the big instrument can always be placed safely on the ground or floor for storage or even just for a rest during handling. It then stands 215cm high [7'] between the rafters with the focuser wound right in. The focal length is 216cm. I have a 16" [40cm] long, full dewshield which simply slips snugly over the first to slow up any dewing. The sheer scale of this classical refractor OTA really has to be seen [and felt] to be believed!


Click on any image for an enlargement.

*
29.3.17

Pier height and dome clearance. Pt.2

*

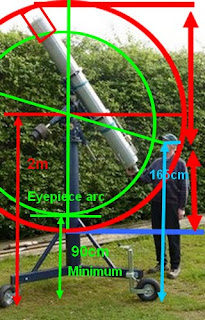
My plan is to see how much actual dome clearance there is above the long dewshield. Then raise the pier height slightly if possible. Or  just raise the tube in the rings. Though this is not the same thing since only pier height affects the OTA's height over the sill. This will give me the maximum eyepiece floor clearance. The dome will have internal reinforcing angle profiles at intervals so it may not provide quite the clearance I hope for. If it becomes desperate I can use flat [or flatter] sections instead. Hence the choice of 3m semi-diameter for the "dome" in the hope of some reserve clearance. This should allow some leeway in height and positioning.


Or, not. The long tube OTA is balancing nose heavy. I shall have to add another sliding balance weight at the focuser end. Though where I'm going to find an identical stainless steel towel rail I have no idea. The one I have is absolutely perfect! It came from a charity shop for only couple of quid equivalent.  Famous last words. It is an Ikea product. Flat rectangular SS plates to fit on the 8"Ø main tube after gentle curling in the soft jaw vice. Stainless steel screws in the ends of the tube so the whole thing can be dismantled with ease to slide the home made brass weight on and off without effort. Only a fiver equivalent plus postage. Whoopee! 😊

Initially, I had to space the bar supports to allow the brass weight to slide over the Orion UK rolled tube rings. Then I swapped to the heavier rings for greater rigidity and the spacers shown became redundant. I doubt anybody but an ATM would need such a large sliding weight support but it is an ideal and rigid solution. he standoff of the rail/bar/tube sets the maximum diameter of weight allowed. Any larger and it rubs on the tube, or the end brackets.

Even the refractor's internal baffles affect the bracket fixings. Long screws, pointing inwards, would hinder the baffle 'tree' from sliding into the refractor's main tube. So I reversed the stainless steel screws to bring the nuts and lock washers external. Forcing my hand through the razor sharp, smallest baffle nearest the focuser was painful. Getting it back out after pushing my forearm through to the limit was even more unpleasant. No blood but a few red marks for my trouble.

Eventually I decided to scallop the edges of the last two baffles to let it slide over the screw heads unhindered. Edge scallops are supposed to aid the refractor's internal 'seeing.' By avoiding thermal currents flowing through the central apertures in the baffles. The scallops are supposed to let any airflow move up or down the tube wall outside the baffles. Where they will not inflict themselves on the light path. Some rotation of the scallops, from baffle to baffle, would seem appropriate to avoid stray light taking a short cut between the objective and the eyepiece.

Rather than make the trip into town I decided to turn a second identical weight out of scrap brass to add to the existing weight rail. A second bar can be bought next time I am in the Ikea area. I needed to obtain a better balance point to avoid ground-scraping eyepiece positions. Each brass weight is 3.5lb. The second one should be more than enough to re-balance the heavy 7" iStar objective in its cell. This will allow me to raise the OTA in its clamping rings but adds more weight to the OTA. Weight adds to the OTA's moment as well as making it more difficult to carry and fit to the mounting.

I didn't have a spare clamping knob handy and the second weight will be fixed for all intents and purposes. It just ought to have  a matching, plastic knob to look quite right. One does have one's pride even as an ATM committed to scrap metal, charity shop saucepans and flea market finds.

Those burdened with pedantry [like myself in a former life] will notice the hole in the weight looks slightly too large. This is a deliberate mistake born of the need for the weight to go over the slightly expanded ends of the tube. I made it as close to 16mm as I could but it is still [rubber hammer] tight at the ends. Being hollow, I had no desire to reduce the diameter of the tube just there. They obviously used a press to fix the screwed end plugs rather than weld them. WYSIWYG. It was ever thus.

To ensure I had the OTA's middle, balance point I had to fit the lens to the long tube. It looked so filthy with collected dust and dried dew that I gave it a clean. A rubber bulb, dust blower first, followed by a gentle brushing with a large, natural bristle make-up brush. More blowing followed by a brushing with lens cleaner. Then a wipe with a lens tissue followed by gentle drying with a well washed microfiber lens cloth. It looked fine after another blowing with the lens bulb to evaporate the remaining film of lens cleaning solution.

The balance point is now within a centimeter of the center of the tube when rolled back and forth on a thin steel rod to act as a fulcrum on the workbench. I discovered, years ago, that a larger diameter rod would tip the OTA too much each way and make the balancing too clumsy and slow. Twirling the rod slowly with the fingers ensures the telescope tube isn't joggled as it gently finds its own balance point.

I use a folding B&D workbench with four widely spaced, large, plastic press-in blocks to stop the tube from rolling off. If an OTA did roll off it would be a disaster with the objective likely to be cracked across by the impact with the floor or ground. Never lay any OTA, of any size, on a flat surface and expect it to stay there!


Click on any image for an enlargement.

*

26.3.17

Pier height and dome clearance.

*
 
An important consideration is pier height. Depending on the length of the telescope this affects ground clearance and maximum height when pointing at the zenith. This, in turn, affects the choice of sill height of the dome slit. Meanwhile the top arc, scribed by the dewshield, must clear the inside of dome. So all these dimensions are inter-related. They directly affect the height of the fixed walls of the observatory and the height of the pier.

The image shows the arcs of the long refractor 180mm [7"] f/12. The Dec. axis, when horizontal, is at 2m from the ground. In a 3m diameter dome it has no need of a pier quite this high. Particularly when the Heavy GEM is employed. Note that the circles should really be concentric. I exaggerated the height to show the effect of adding the longer dewshield.

From direct measurement of the OTA, on the MkIV mounting, I can allow the Heavy GEM to sit on a 1m high pier. Which by happy coincidence, is the height I have chosen for a temporary stand. The Heavy GEM is 64cm high from underside of the base plate to the Dec axis center when horizontal. Again, by coincidence this pairing exactly matches my eye height [while standing comfortably] at 164cm.

I made some more eyepiece ground clearance measurements, while sitting on a handy [empty] beer crate. Which measures 27x30x40cm. On the lowest 'seat' height I can easily use a 70mm eyepiece height with its axis horizontal in a star diagonal. Being able to sit allows the observer to relax. Which means that I easily seat myself on a plywood observing box of [say] 20 x 30 x 40cm for those rare occasions when I actually want to stare at the zenith.

While the Moon can get quite high it is rarely that the planets reach such altitudes here at 55N. I can remember only one particular night when Saturn was high overhead. The seeing suddenly sharpened to single pixel viewing quality through my [normally indifferent] 6" f/8 refractor. It was just as if I was floating at a distance in a spacecraft with perfect windows. I stayed up just staring at Saturn until after 3am and was suitably admonished for my errant behaviour.  

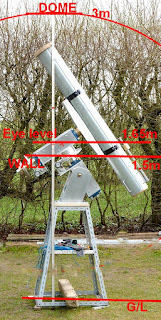
Image showing the bare 7" f/12 refractor tube at 180cm long with batten marked at 3m high. The are two different lengths of dewshield. The fixed dewshield is 20cm long while the full length one is 40cm. [2.2xD and simply slides over the shorter one.] The 2" star diagonal and Vixen 2" focuser add another 20cm down at the bottom end. So the straight tubed refractor is about 240cm in length when complete.

Assuming I balance the refractor OTA in the middle, using the sliding brass weight, I can easily clear the 3m dome. This would be with a wall height of 150cm to the sill of the open slit. With the horizontal Declination axis at 165cm high I can view distant trees with the OTA horizontal should I feel the need without losing any clear aperture. The top of the long dewshield is at its furthest from the ground when pointing at Polaris with the tube over the Polar Axis. When looking overhead the rotation of the Polar axis lowers the OTA on the end of the Declination.

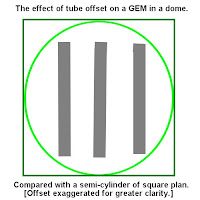
The OTA axis offset of a GEM, [German Equatorial Mounting] from the center of the pier, requires a little more space when pointing at lower altitudes. In a hemispherical dome this might matter. Since I have chosen to build a half cylinder it doesn't affect the clearance nearly so much. There should also be more room in the half-cylinder to move around the telescope in the confines of the observatory without bumping into it. This can be an important matter while imaging. Nudging the telescope can also require mounting re-alignment for Gotos should the drives lose track of the telescope's exact pointing position.


*

25.3.17

Observatory siting issues.

I am meeting some 'local resistance' over the sheer size and height of a bigger and taller box than the shed's own end gable. My plan to place the observatory in an 'uninhabited' zone requires a taller dome and floor. The ridge of the 45° pitched, shed roof is about 4m high from the general parking area. If I want a near-horizontal view from the intended site I would need to lift the dome to achieve this. The alternative is to bring the footprint forward so allow an eastern view across the front of the shed rather than needing to peer right over the ridge. I would lose northeasterly views but these are not the highest priority.

My 'advisor' is now suggesting a much reduced height of box. Set on bare stilts to support the dome and provide the observer's accommodation. This is considered more desirable than a 3.6m square block of grooved plywood. With the shed's gable end looking rather like a small house, left behind when skyscrapers went up. A tower should be lower than the main body of the house. Not the other way around.

There is a strip of prime real-estate running across the back of the parking area. It mostly houses my existing telescope piers, firewood storage boxes and the car trailer. While open stilts will provide a much lower potential impact, it does bring the dome forwards by enough to raise all the consequences of perspective. The original site would be 4-5 meters further away. Bringing it forwards would increase the observatory's  visual impact considerably. Not that it matters from a visitor point of view. The area is largely hidden except when the 3m tall hedge is at its barest in late winter. Perhaps the ideal situation is to have the front of the box/dome level with the shed gable? And, of only the same overall height. I'd lose a bit of sky to the east but it would be low enough not to offer good seeing anyway.

By adopting stilts there would be no problem with varying ground level. Only the rear would be below normal surface level. An extra couple of feet on the rear stilts would easily solve that problem.

As I was cycling along I had another idea. I could build the dome on the ground and then take it apart for re-building on top of the box as a ready made kit. This might save getting in a machine to lift the whole dome high enough. Though I shall have to talk to my neighbour whose family are in farming. He may know a tame bale-loader driver in the area who is badly in need of beer money.

Access to the back garden is very narrow which limits my [vehicle size] lifting options. Once the observatory is completed and bolted together there will be no need to be drilling new holes. Nor the need to be juggling panels to find the best fit while desperately trying not to drop them all the way down to the ground.

I had a look at grooved, cladding plywood. The cheapest, discount DIY store 12mm was rather featureless. [Though you may like that sort of thing.] Across the road at the 'proper' builder's merchants the price was exactly double and it looked distinctly rough and knotty by comparison. So it's all swings and roundabouts in cladding plywood. I never painted my grooved plywood shed. Preferring the pleasant aging to a dull, matt, grainy brown. It hasn't show any sign of breaking down over the years.


*

24.3.17

3m [10'] half-cylinder, aluminium observatory.

*
With the calf domes weighing in at 250kg or nearly 500 lbs I really had to find an alternative. After endless messing about with full scale models I decided The Pulsar 2.7 just isn't big enough. The next step up is to 10' or 3m. 

My wife agreed that it would be the better option because I could build something to exactly suit my needs, rather than accepting simply what was available. The budget which was formerly going to be invested in the calf shelter or the Pulsar would probably be halved. Simply by doing most of the construction work myself.

Image "borrowed" [for educational purposes] from the remarkable Astronomy Center UK website where there two examples of the semi-cylindrical observatory type are shown.

 http://www.astronomycentre.org.uk/index.php/members-gallery/the-dome/equipment

http://www.astronomycentre.org.uk/

What I could not do myself, at least not with any degree of certainty, was bending the long, half circles of aluminium angle. These would help to reinforce the inner and outer edges of the half cylinder 'dome'. So I cycled off to a small metal fabrication company some ten miles away who had been helpful with materials in the past. A simple drawing showed what I needed and I ordered some more alu. angle to make the rest of the framework. They have a sophisticated, powered bending machine which would ensure the half hoops would remain flat in the other dimension. So that the adjoining vertical walls will be flat.

Keep it simple and get it done! This is the new order of the day. I have wasted years longing for an observatory and not having the budget, nor the skill, tools or materials, to do what I really wanted. Not to mention those huge birches being right in the way!

The observatory will be a simple aluminium half-cylinder mounted on a tall, grooved plywood box to match the shed. It will rotate on small rubber wheels with decent bearings. Two shutters will part in the middle to lie close to the curved roof of the half cylinder. Unlike a hemispherical domes the bi-parting shutters on a semi-cylinder do not extend "out into the wind." Remaining almost flush with the outer areas of the cylinder as they slide horizontally to leave the slit wide open to allow the telescope[s] to see the sky. Probably an improvement compared to the poorly balanced, up-and-over shutter design. Which needs great care to avoid being 'dropped' in either direction. 

I have already started clearing and roughly leveling the [semi-woodland] ground where the observatory will be sited. The death toll was only one leggy shrub and one very skinny sapling. Unfortunately the ground slopes away from the shed as well as being about two feet lower than the adjoining parking area. It was once dominated by two very tall birches which rained twigs, leaves and seeds constantly over the entire back garden. The heavy 'rounds' which I chainsawed from the tall birch trunks have been moved out to the edges of the area. The ancient and rusty tin trunk still contains PVC drainage off-cuts saved for a 'rainy day' almost 20 years ago. Somehow it had become lost and forgotten over the years.

*

23.3.17

Making the 10" f/8 out of Porsa tubing?

*
If I ever want to have a finished and useful tube for the 10" f/8 reflector it ought to be soon. I have wasted years trying to be clever without much success so far. The folded refractor used black, Porsa System, square tubing. This stuff is held together with alloy-reinforced, plastic joints in a complete range of leg numbers or branches. The joints are hammered home with a plastic, or rubber hammer, to avoid cosmetic damage. Resulting in a remarkably stiff framework. 

You can tell how tough it is because of its widespread use supporting massive fish tanks in great numbers and sizes. Often simultaneously on tiers of tanks. It can be dismantled again but it not an easy task and liable to cause damage. I had to open up a couple of joints myself but it did not seem to reduce the stiffness, or tightness, of the resulting framework. 

One vitally important aspect is maintaining parallelism between opposing sides of the frame during the build. The joints are very stiff and will not bend to accommodate lozenges. This needs careful thought and some common sense designing and putting it together in sequence. Closing a joint, only to find you have completely forgotten the parallelism rule is a real bore. Holding the tubes with heavy rubber gloves can help as you hit the tubing in mid air and hope it will come apart. Sticking the tubing in a vice is apt to damage the excellent finish. 

The cost of making a 2m long frame with 16 cross tubes and all the necessary joints comes to about 1600 Danish kroner. About £160 GBP. The great advantage is neatness and having a completed, stiff frame withing half an hour of starting. Add the mirror cell, spider and focuser and it is ready to use. 

I was going to frame both ends and have more frames at each end of the saddle to avoid flexure compared with unsupported main tubes.

I should have put another frame in the middle of the folded refractor had I thought about it. Though the lack of  center reinforcing frame doesn't seem to affect its remarkable stiffness.

Pulsar 2.7m and a very large shoe-horn?

*
Having discovered the sheer weight of the 4.4m calf dome I had to have a serious rethink.

The 2.7m Pulsar is likely to be somewhere around 2.5m between opposing ribs. The reflector is 2m long. That leaves 18" maximum clearance to be shared at both ends. Not that it is ever likely to be used horizontally. The 7" f/12 refactor will not fit horizontally with any sort of dewshield in place.

I daren't trust my optimism so I needed a full scale simulation. Half an hour later I had three stepladders and bike stand supporting some drain rods in a 2.5m diameter circle at about shoulder height. I carefully arranged these around the folded refractor on the big mounting on its 1m tall test stand.

A 2m length of alloy, simply tied onto the refractor framing, simulated the piggy-backed reflector for length. I even added a bit of hose to make a full scale dome profile. Somehow, I doubt this is going to offer much shelter from the wind!

I built the shed, working alone, years ago and it is still standing. The dome would be placed half way back, along this side of the shed, with a suitable access gap between the two. The 2.6m dome is about the same width as the shed. It is intended to have the observatory floor at eaves level to allow a clear view over the ridge to the east. You would not believe how many times I have climbed a ladder, leaning against the shed, to imagine the view from an even more imaginary observatory.

We must now assume that I am not daft enough to make a tight, cylinder wall of the exactly the same diameter as the dome. If this assumption holds true then I think we have a workable size of dome in the Pulsar 2.7 flat roof [or dome kit] fitted on a larger, square "box" observatory.

If I follow this path I get a ready-made, off the shelf, well-proven and working dome. Throwing a simple box observatory together is fairly quick work. A raised box with 8' legs is slightly more work. The upside is that it won't completely dominate the back garden. I had superimposed a 4.4m observatory on a photograph of the selected site and it was absolutely vast seen from the house!

The Pulsar 2.7 is relatively tiny at the correct scale.  Though the space it takes up is largely irrelevant anyway. It is an unimportant area containing a few leggy shrubs and tree saplings where once two huge birches were standing. The downside is having exposed steps unless there is room for a trapdoor in the necessarily much smaller footprint of the observatory floor.

My wife suggested placing the Pulsar dome on top of the shed. An interesting idea at the risk of leaks while under construction. Lifting the dome into place would need a crane. Or very great care. But what a view! The internal supporting structure would make working in the shed far more difficult though.

*

22.3.17

Reality? Nope!

*
An 18 mile round trip on the trike and I had hands on experience of the calf dome at a nearby farm. Having laid out a ring of poles in the lawn the real thing looked about half the size in the the open air. It was certainly no smaller than those offered today because it was about a foot [30cm] taller than I was. Standing right next to it seemed to make it shrink. It certainly didn't look remotely like 14' across! Though must have been.

That is loose hay resting on top, the black mark is not a crack but a scrape and somebody has started to paint it by the look of it. A search of aerial views, by year, shows it has been in place for at least 5 years. Methinks it looks much older than that. Or perhaps it has been pressure washed against the manufacturer's advice. I ran a GRP sports car for ten years and it never visibly deteriorated even when I took time to paint it. The car lived permanently out of doors.

The external joint ribs of the dome were about 6mm [1/4"[ thick. I'm thinking these stiffening/joining ribs could be reduced in height slightly for cosmetic reasons. The shutter supporting arcs will help to reinforce the center segment. Using many more clamping bolts than standard would bring them much closer together with no real loss of overall strength. The idea of longitudinal ribs is quite interesting because they act as natural gutters to carry rain away downhill to the "tail end" of the dome. 

The active farm dome I saw had a bolted, galvanized channel surrounding the arc of the open doorway. A 4" wide flange right around the base would be ideal for bolting on a laminated plywood ring for a rotation track. 

Most of the visible marking here seems to be green algae. The structure itself looks fine. NO worse than my large GRP satellite dish which has been exposed to all kinds of weather for a couple of decades. Brand new roofs in the countryside get covered in algae and lichens in only a couple of years.

I now have prices from two of three dealers I contacted each supplying different makers' products. I should have the final price tomorrow and can then decide how to proceed. These domes are available in green by some makers. Which is fine for an "invisible" garden dome but it will have completely different thermal properties to a [much preferred] white one.

The third dealer quoted me a figure of half the previous two but now has to contact the manufacturer to confirm. Three days without a firm price does seem excessive.

Whoops! While poring over the igloo brochures I finally found some specs. The Holm&Lau Igloo dome weighs 485lbs or 220kg total weight! Eek! That's over 160lbs per segment. Ouch! I don't think this is [remotely] manageable by me working alone. Grr!!

[Later it occurred to me that I could ask a local farmer with a big bale, telescopic loader to lift the completed dome onto a prepared and wheeled base ring.  I just wonder if the loader would go through our front gates.]

The choice now seems to be between a metal turret or a Pulsar 2.7. I really don't think the Pulsar is remotely big enough for my needs. Back to the drawing board.

Click on any image for an enlargement.

*
21.3.17

Just when you thought it was safe..

*
Now for a complete change of direction:

I have remembered a white dome I had seen on a local farm a couple of years ago. I stopped and asked the farmer how much it had cost him... and immediately dismissed it as an unlikely candidate for an observatory.

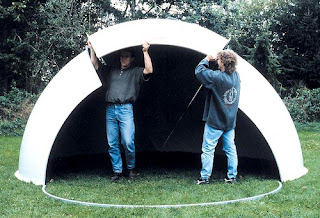
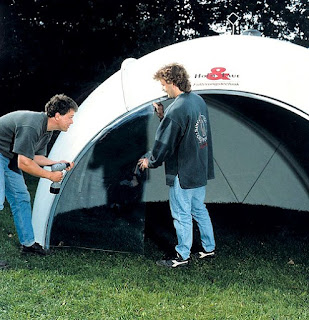
In my over-hasty judgement I had imagined it to be made of smooth, moulded, white plastic and the online drawings suggested a double roof. The lines were actually the two longitudinal seams. Now, thanks to further, and far more careful online research, it seems these things are made from sturdy GRP in three segments. The images borrowed from an online brochure show it is only a two man job to assemble.

Several European GRP silo manufacturers compete for the market for these calf rearing shelters. I contacted a couple of Danish dealers for pricing, earlier today. Not too terrifying for anybody in the market for such a thing. Expected lifespan is at least 20 years and they must be easily robust enough to survive a herd of 15-20 panicking and kicking calves! Moreover they [the domes, not the calves] have a solar reflective coating to inhibit solar heating. You couldn't ask for more! 

These potential "domes" are about 4.5 meters in diameter! Were these complete astronomical observatories one could easily add a nought to the figure I was quoted over the telephone. 4.5m is about 14'6" in old money. With a height [naturally enough] of half that @ 2.2m meters or about 7'3" and change.

Once modified into a "proper" observatory, with a rotating ring and wheels at the base and an up and over opening slit, the dome makes huge, economic sense. A base wall also makes sense if extra headroom is required.Which is likely with a dome of these dimensions.

Modification is certainly not a task for the faint hearted and will instantly trash the manufacturer's guarantee. But just think! You could swing a very serious refractor [or reflector] in there! And still have room for several Cats. 😉

It is very tempting, considering the cost of a bare 2.7m or 8' and something, astro dome. Not that I am comparing these items on cosmetic or even functional grounds. Not at all. That would be grossly unfair to observatory manufacturers. Their wares would be expected to be flawless on arrival and stay that way for quite a while. Or the word would soon go around the astro forums. But still, it does make one think furiously at the possibilities of these humble animal shelters.

Compare this to building a complete metal dome from scratch. You'd need a complex and sturdy framework first. Hours of sawing and mountains of sawdust and all that crap in your lungs.

This image shows the true height and scale better than the others.

Imagine handling huge sheets of razor sharp, unwieldy sheet metal in a gale from a tall and shaky stepladder. Now struggle to avoid kinks and wrinkles as you desperately try to accommodate three dimensions with flat sheet which knows of only two. Now add your disfiguring rivets or bolts or untidy flashing. Add an overcoat of fiberglass mat and resin followed by several decades of toxic sanding and hospitalization.

With a GRP dome you run a string of silicone along the seam. Then bolt the three segments together and it is immediately waterproof and stable.  The manufacturer's claim only half an hour for two people to assemble.

Sawing an observing slot in the center segment requires very careful internal support until the panel can be fully reinforced. By far the best idea is to reinforce it first. You will have to anyway. So why not do it before you break it? The dome would want to be complete before being touched with any cutting tool. Or it would distort at the first cut. The slit reinforcement replaces what was taken out of a carefully designed assembly of parts into a completely stable, self-supporting [hemispherical] form.

The whole thing needs to be safely protected against any flexure or damage until the slit and shutter work is complete. Epoxy bonding, as well as securely screwing the necessary [plywood] arcs, seems like a very good idea. Internal trestles with curved dome supports are easily out together out of wood. The weigh of the supported center segment is not enormous. Actually, each segment weighs about 160lbs!

The brochure and assembly instructions specifically warn against allowing the panels to flex until the dome is completely assembled. It has a strong steel hoop to reinforce the door arc. I think I'd be closing the open door area with reinforced plywood and very well attached. You don't want to be struggling with a massive GRP 'spinnaker' in a gale. Not unless you are hoping for a new Guinness free flight record!

This afternoon, in a snowstorm, I laid out battens 4.4 meters along along the ground and stood up a stepladder to suggest the expected height. Then I laid out some rope in an arc to show the circumference. This thing is absolutely terrifying in its sheer scale! It will need to be very safely restrained with sturdy hooks to anchor it down at all times. Letting strong winds get inside with the observing slit wide open could be an expensive and potentially lethal mistake. Common sense is obviously required to attack and complete such a project successfully.

I'm now asking myself whether I have enough common sense to take on such a thing at my age. Having it sited down on the ground seems like a necessity rather than trying to lift it onto a raised platform. But where could it go without losing most of the sky to all the tall trees and hedges?

Perhaps I am simply exaggerating the problems. The brochure mentions fitting a lifting eye at the top of the dome. So a tractor, or loader, can move it easily around the farm. There are even online videos of this happening. They can't be very fragile if farmers can abuse them for years on end under all working and weather conditions. Not to mention their being placed at random orientations to the wind and weather. Always with that large, half-moon door wide open, so that frisky and hefty animals can rush in and out.

If I could place one of these domes on the ground, on low supporting walls, I would not hesitate to use one for an observatory.

All images were borrowed from Holm & Laue's online brochures.

Click on any image for an enlargement.


19.3.17

Double telescopes?

*

Having spent so much  time and effort building a German mount I now find myself rather wishing for a fork. A fork mounting is far more compact and can be centralized in "the dome." This non-offset support system would allow my long telescopes to function in a smaller dome. Any offset demands the dome be bigger to house the object hanging off  to one side of the mounting's center point. My GEM even has a big fat cylinder on the PA. Just right for carrying the extended, cantilevered loads via rollers for a fork.

Let thee think all this is unimportant I beg to disagree.  Every extra foot of dome diameter costs serious money. Making the telescope physically smaller helps. A refractor and a reflector are as physically different to house as you could wish for. The reflector wants a low opening to reach lower sky altitudes. The refractor needs a tall pier or it gets all huffy and demands the user grovel in abeyance when looking overhead.

With the refractor literally laid tightly over the reflector I'd have a dual purpose, reasonably well-balanced monstrosity to fit in a minimum observatory diameter. The idea is really quite simple. The heavy refractor objective balances the equally heavy mirror in the same tubular[?] framework. Two evenly sized kids on the seesaw if you missed the point. Though one is hunched down and clinging on while the other is [unaccountably] sitting high on a box. Don't ask me why but that's the gist of the arrangement.

The closeness of the optical paths removes the need for dual OTAs. Allowing the reduction of duplication of support tubing in a single frame of modestly rectangular cross section. And avoiding a telescopic pier of epic proportions and change in height. 

The problem now is that their combined balance point will be somewhere in the middle of the hybrid's tube. Demanding a very long fork if northern pointing is desired. Though this is not really essential.

Offset forks are used, but this would demand considerable counter-weighting for such a weighty "double" telescope. Despite the potential problems this whole idea really appeals because I already have both objectives. Far better [surely] than swapping heavy OTAs on the mounting, at intervals, whenever the whim takes me? Increasingly rarely I would imagine with my now, rapidly increasing age.

The most obvious alternative is closely mounting the folded refractor on top of the reflector instead of the long straight one. This lifts the refractor's eyepiece and star diagonal to a potentially far more comfortable position for most pointing altitudes. The downside is the much greater depth of the dual instrument to house both optical paths without conflict. The further the center of mass from the PA the more counter-weighting is required. Unless you use a normal fork instead of a GEM or offset fork.

The upside is the potential to place the folded refractor slightly lower on the reflector tube. Which would move the balance point lower on the combined OTA. Requiring a much shorter fork. Though this ruins the chance to have the refractor eyepiece at a reasonable height from the floor. Just to avoid unsightly grovelling to the gods of the overhead sky.

A 90cm [3'] high lowest eyepiece level, when pointing at the zenith seems about optimum for a normal height of my folding wooden chair. If the refractor is being used for imaging the EP height becomes largely irrelevant but should still be kept in mind. A stepped height seating 'box' offers room for variation in eyepiece height from the observatory floor. At the risk of increasing clutter and something else to fall over in the dark.

Even with a very squat mounting and pier height the rather long 10" f/8 reflector needs a stepladder to reach the eyepiece at higher pointing altitudes. But again, is completely free of such problems when imaging. It is not intended that one OTA be used for guiding the other for imaging. Any manual guiding will be monitored on the computer screen. Though occasional
visual comparisons through each OTA might be very interesting. In order to compare the seeing conditions, resolution and optical quality in the two very different instruments. It is not very likely I would avoid visual observation having gone to all the trouble of building or obtaining an observatory.

The next question is whether I should use the same Porsa, tubular build system for the reflector which I used for the folded refractor. It would make some sense to combine the tubes which lie between the separate, but closely arranged, instruments. Duplication adds more weight without adding very much extra stiffness. Though two individual instruments could be simply bolted together with the option of their easy separation later on. Combining them in one framework makes their separation far more difficult. It also makes for a very "lumpy" load to dismount in one piece. Removing one OTA is bad enough and has needed a chain hoist.

The image alongside shows the relatively low balance point of the 10" f/8 reflector alone. I later lowered the pier by another six inches to allow the mirror cell to just clear the ground when pointing at the zenith.  This reduced the height of the necessary stepladder to reach the eyepiece.

The freedom to move the folded OTA, relative to the long reflector, would greatly simplify finding the best combined balance point when both are fixed together. The two complete instruments need only be clamped temporarily together until the ideal balance point is found. The diagrams above shows the general idea. With the arrows indicating how the folded refractor should be  moved up and down to find the best combined balance point while matching the ideal eyepiece height.

Mounting the OTAs on opposite ends of the GEM's declination axis is possible but even more bulky. Requiring a much larger dome to be able to move safely around the instruments in a cramped space in the dark. There are also pointing positions where one, or the other instrument, will collide with the pier. A fork avoids such collisions while keeping the OTAs central in the limited diameter of a round observatory.

A wider fork would allow both instruments to be mounted alongside each other. I'm not sure I can see any advantages in this arrangement. Though a fork mounting does safely avoid the necessary counterweights of the GEM dangling invisibly in mid air. Just waiting for the observer to walk into them in the dark. Or [worse] stand up from crouching or crawling under them to cross the observatory floor.

Click on any image for an enlargement.

*
18.3.17

Observatory hunger strikes again!

*

As I struggled to adorn the folded refractor OTA and mounting with several tarpaulins in a gale, I longed for a proper observatory. Just imagine never having to protect the equipment from the elements ever again. Just imagine being able to go out there, open the shutter and start observing or imaging. The often large investment in all the tools of amateur astronomy is often wasted. Simply from the mental inertia involved in getting all the kit set up outside. If polar alignment and optical collimation are also required then the desire to brave the cold and the wind may easily become an insurmountable obstacle in the mind of the would/be enthusiast.

The number of hours spent observing is inversely proportional to the number of hours wasted carrying and setting up heavy equipment. Why not put all the observing and imaging tools in an observatory-shaped toolbox? 

For the umpteenth time I looked at the Pulsar observatory dome website. 2.2m is definitely too cramped but what about the 2.7m? I measured the straight refractor tube and then the 40cm long dewshield and fumbled with the focuser under the tarpaulin. Another 20cm? Yikes! There would leave only a bare few inches clearance for the straight OTA. Even if I made a larger box to carry the dome I'd be struggling to move around the telescope. Probably banging my head on the underside of the supporting ring too. Bøøger!

Enter the turret, barrel, or half cylinder dome, stage right. [Again!] A quick google for virgin aluminium sheeting showed 1.25 x 2.25m sheeting is readily available for only an arm and a leg per sheet. Throw a little-used kidney into the budget and you can even have pristine, white coated aluminium. With a RAL number and a protective film to boot. Only £150 a sheet plus delivery! Gulp. You wouldn't want to get the design and build wrong, would you?

None of your struggling with wrinkly hemispherical metal gores for me. As a two-dimensional sheet refuses to accommodate the usual three. Four flat, but gently curved sheets and you can have a flawless, finished, half cylinder roof. Two more sheets and the up-and-over shutter is in place!  It can be very slightly bigger than 3m per side with only one neat seam as an epaulet at each shoulder. The half moon ends would obviously need closing off too but those are flat and undemanding of fighting with spherical geometry.

The square shoulders and wide opening provide plenty of room and no problem looking out the wide slit even with a typically offset GEM. Plenty of headroom right out to the gable ends. Or for equipment storage where it won't be interfered with in normal use.

Previously my thoughts have centered around gently bending, thin plywood. Or even hardboard over a traditional  curved, laminated plywood form. Probably followed by smelly fiberglass and hours of sanding and then painting for long term waterproofing and coolth. But why bother with all that extra work and weight if the job only needs doing once? Aluminium sheet is very long lasting if it is thick enough to be largely self-supporting in cylindrical forms. Though I have my doubts that it would get away with only edge support.

DIY dome ribs are traditionally of softwood or laminated plywood. But, what about gently curved angle profile aluminium? It might be a bit pricey if an engineering company was paid to curve the angle to a gentle 1.5m radius though. Why not make an angle profile rolling machine?

Metal profile benders [more actually rollers] are fairly simple affairs of three rollers. Grooved or multiple rollers with suitable spacing would do. Crank the aluminium profile through the rollers and, hey presto! You have a curve depending almost entirely on the pressure applied by the middle roller. Pop rivet the angle at the dome shoulder and it becomes largely self supporting. A stripe of silicone will ensure a tight seal. Well, it's a plan, of sorts. Not wishing to reinvent the wheel, I had better ask an expert. Astro forums are full of them.

The square-shouldered "Nissen hut" just needs to be rotated on the spot of course. A well tried arrangement of a plywood base ring. With numerous, small rubber wheels with journal bearings to carry the weight and provide low friction. All without demanding a perfect rolling surface like steel wheels or naked journal bearings would do. No expensive, curved steel ring required to act as a rail for grooved wheels. No noise, late at night, either.

There is also the possibility of using rolled, corrugated sheets for the roof and sides. Farm stock, like goats, pigs and perhaps sheep, rely on small "tunnel" shaped buildings. Miniature Nissen huts if you will. I am still unsure how small a radius can be obtained from stock. Nor whether they would be available in sun reflective white. Most seem to opt for farmer's grass green.

*

16.3.17

Testing the balance and tracking.

*

After lunch I continued tracking the sun and checking the slewing. There no complaints from the stepper motors now that the system is balanced.

The image [right] shows the first folding mirror of my 7" refractor. Both mirrors have protective plastic food storage tubs covering them when not in use. Both mirrors are "water marked" from repeated dewing in use. Any serious dewshield would need to be offset, or oval,  to avoid vignetting. I am unsure how useful the black cloth I bought for a potential shroud would obviate dewing. Even the back of the objective used to dew up in use. One of the reasons I preferred the straight tube arrangement. Perhaps I ought to try the long tube version on the new mounting.

Note the mirror's greatly enlarged support and collimation triangle with fixed apex point. This provides stable and "slow motion" adjustment to the mirror in all planes. I have now added an aluminium stray light exclusion tube with end baffle in place of the earlier cardboard one. The focuser and tube rotate in the back plate against PTFE rings, inside and out, for smoothness. An earlier metal to metal version was hopelessly sloppy and often very difficult to turn due to friction.

It feels rather sophisticated to have four speeds available to Slew, Move, Center and Guide. Far more useful and predictable in effect than a variable speed [VFO] synchronous system like that on my the Fullerscopes MkIV. Even using my lowest power, 32mm eyepiece @ 68x the Slew almost whips the image out of the field of view. Move, Center and Guide each offer reduced speeds in consecutive order. No doubt their efficacy become increasingly important with increased magnification or when imaging.The IH2's helpful little screen shows which drive or control rate has been chosen.

The next image [above] shows a nearer view of the folded refractor pointing at the zenith with the Dec axis horizontal. I have doubled the aluminium, channel section saddle. The two halves are pressed back to back by the large ring of clamping screws of the Tollok bush. Each end of the saddle is also clamped together by the crossbar fixing bolts.When the temperature is more suitable I shall epoxy the two channels together int an I-beam for greater stiffness. The plywood crossbars can be replaced by stiffer metal components when I find suitable materials. The crossbars could even be fixed inside the framework to reduce overhang.

The OTA can be safely rotated 360 degrees right around the Polar Axis with the Dec axis at the correct angle. Allowing a "weights-up" horizontal parking position if so desired. This places the OTA at its lowest possible condition to avoid high winds. It also requires the minimum cover height or size of tarpaulin. Though I would much prefer a more permanent solution once the raised platform is completed. Either a roll off cover or a cylindrical observatory would be preferable for rapid deployment and much greater protection.

This last image shows the AWR electronics sitting on the pier shelf. Thanks to the latched plugs and sockets, on all the leads, the electronics can be quickly and easily removed to safety. Leaving the stepper motors and their cables fixed in place.

I want to mass load the base of the slotted angle pier/stand to see if it helps stability in windy conditions. At the moment the stand is resting on blocks of scrap aluminium or wood for leveling on the uneven ground. Not an ideal arrangement, but I'm hoping to raise the platform long before the stand starts rusting. Famous last words!

I found somewhere out of sight to hide all the potential telescope making tubes. These have been adorning the side of the back yard/parking space for ages. Often spoiling the backgrounds of my ATM images. It would help if I could get rid of the car too!

Click on any image for an enlargement.
*

Folded OTA mounted at last.

*
I needed the double stepladders and chain hoist to lift the folded 7" refractor onto the mounting. Two 5kg [10lb] weights balanced the OTA nicely. 

Rather than make some sort of bayonet mounting I sawed some 3/4" x 2.5" plywood strips to mount the OTA with screws through the framework. Not ideal, but the plan was simply to check out the balance, clearance and performance on the new mounting.

I had to cut and turn a 60mm length of brass tube to space the counterweights and retain the Dec wormwheel in the correct position. Otherwise the weights and wormwheel could slide up and down the shaft.

There is some backlash in the PA as I try to rock the OTA around that axis. The free play is not in the wormwheel/worm but in the 7" diameter PTFE clutch. I tightened the screws which force the nylon pads in the wormwheel boss onto the shaft and this helped. The Dec worm needs to be closer to its wormwheel to remove mechanical backlash.  Longer slots for the fixing screws are required.

Without more than very rough optical alignment I took an afocal snap of  440 yards distant trees with my TZ7. I would easily see something as small as a match head or fly at that distance. Nicely monochromatic result for a colour shot through a 32mm Meade 4000 Plossl and 7" f/12 refractor. I shall have to try my short zoom compact as it does a much better job of afocal snaps.

Not wishing to dismantle the mounting again. I used a mains drill with a small router bit at full speed to make the elongated holes in the base plate for the Dec motor/worm assembly fixing screws. It felt horribly rough while cutting but made quick work of the job. I finished off with a round file to smooth the slots. There is solid engagement of the Dec worm and wheel now. I used spring washers and ordinary nuts rather than Nyloc nuts for the moment.

The sun kept being obscured by thin cloud but still made a handy tracking target to check polar alignment. I added the full aperture Baader foil filter first, of course. The PA soon proved to be pointing too high but that was soon fixed. Azimuth is only set roughly by compass. I shall have to check the local magnetic variation from true north. [2° 50' East] 

I'm using the IH2 to track the sun without a computer. Solar rate is selectable from the handset menus. Just stopped for lunch but will continue 'playing' afterwards.

Eyepiece height is 90cm when pointing at the zenith.  A comfortable height for sitting on a normal folding chair as shown. 165cm high when viewing horizontally is perfect go for me for viewing distant trees. The wind is quite strong and is causing a slight flutter of the sun's image. This could be due to the rather flimsy stand. 


Click on any image for an enlargement.
*

7.3.17

Test stand progress.


After tidying the ladders away I realised I shall have to set it all up again. The mounting will have to be lifted off the pier to make room for the top plates of thick plywood. I have some aluminium sheet which could be folded neatly over the top plate to give the appearance of solid aluminium. Though the scrapyard might have a thick enough plate of solid aluminium if I keep looking.

Or, I could cut down the size of the top frame of the stand to match the mounting's own 20mm thick alu. base plate. That would provide more even support and increase the taper of the pier sides. The nearer the sides are to an equilateral triangle the stiffer they should become. While a more square form [less taper] is more prone to lozenging. It already feels surprisingly stiff despite its apparent flimsiness. Being more prone to rocking when not evenly supported at the corners by the undulating surface on which it rests. I deliberately did not cut the internal corners of the angle iron away to allow them to slope. This may become necessary if I increase the taper.

I originally intended to make a heavy timber and plywood [pyramidal] pier but thought it best to start with something easily adjustable to check for OTA clearances and height. A solidly built timber pier with stressed skin [ply] cladding should be much stiffer and better damped against vibration. My tilting, miter saw is ideal for cutting all the correct angles on the timber framework. Assuming I knew what angles to saw.

Today, Tuesday, I set up the ladders and chain hoist again and lifted the mounting. Then I narrowed the top of the stand both ways to match the base plate.  It was more of a struggle to get the screws back through the slots but still manageable.

I have a 10mm thick plate of scrap aluminium to cover the top. The mounting can rest on this. Though I might add at least one layer of 18mm plywood as a further stiffener as well. Plywood has the advantage that it will compress locally where it meets the domed screw heads. Allowing more even support.


Having the mount in pieces allowed me to prop up the PA in different positions. I was trying to increase clearance for a potential lower wormwheel position. While it was possible to achieve clearance I was not very happy with the changed appearance. For the moment I shall continue as before with the upper RA wormwheel drive position. This allows me to retain the 7" diameter clutch between the cylinder and the RA wormwheel.

Today, Wednesday, I made a 3/4" plywood top plate for the mounting to rest on. Then I added a 3/4" ply shelf half way down the pier with more slotted angle iron bolted around it. This is meant as a secure resting place for the AWR drive electronics and a serious stiffener for the test stand legs.

I'm wondering whether I shouldn't use some spare pond liner material as a waterproof cover for the mounting and pier. Not that the electronics will be left in the pier but to ensure no dew runs down inside the pier should it condense on the massive, metal mounting during use. The garden collection bag is waterproof but doesn't reach low enough with the mounting in place. The saddle in particular adds enormously to the height of necessary coverage. Rain and wind stopped play at lunch time. I put my work gloves down on the ground for a moment and they blew away!

Drilled the mounting base plate for 10mm hold down screws/bolts. Then marked through the holes and drilled through the 18mm [3/4"] ply, pier top plate. I added a second plate under the top frame, to form a compression sandwich, with the corners cut away for the bolts. It's not all that pretty but it is stiff and easily manageable.

Click on any image for an enlargement.
*
5.3.17

Test stand/pier:

*
Having only four 2m lengths of slotted angle I had to be careful how I dimensioned the test stand. It ended up 1m high with a base of 60x70cm and a top of 30x40cm. This was the largest truncated pyramid I could make out of my smartest stock. A minimum, of 3/4" [18mm] plywood will stiffen up the top end and will probably be doubled to clamp the angle iron frame firmly.

The mounting's base plate and fork with PA bearing housing were manageable without the help of the hoist. I was even able to "walk" the whole thing across the soggy, permafrost damaged grass in the rain for a picture. Though the G-cramps were essential to avoid the mounting sliding off. The overall "whiteness" is just a trick of the flat light of a heavy overcast.

The pier dimensions are just right to be able to use the eyepiece in a 2" star diagonal while seated on a normal chair. This would be with the 7" folded refractor pointing at the zenith. Anything lower would require grovelling on the [usually] wet ground. Anything taller would require a half crouched stance at the eyepiece at the zenith. Though I do have an adjustable chair and plan to image with the refractor.  Imaging would require much less grovelling and/or crouching.

The stand will give me a chance to experiment with OTA clearance and best choice of pier height in practice. When my observing platform is finally built the pier could be bolted down to the floor for total stability. Or, the base frame could be clad to provide a resting place for paving slabs  A much lower pier height would suit my 10" f/8 Newtonian. The sloping sides of  both piers could be clad in plywood for extra stiffness. A shelf or two would further stiffen the structure and provide storage for drive electronics and accessories. Though an under platform storage arrangement would be easier to protect from the weather.

I decided to go ahead and rebuild the mounting outside. To have room to test properly with an OTA on board. Two builder's folding stepladders were straightened out and tied together at one end. Then they were erected over the pier like a very tall stepladder. I clambered up the ladder and fixed a lifting strop over the apex so I could hook on the chain hoist. By moving the bases of the ladders around I could arrange the lift directly over the mounting. Soon the mounting was complete and I could throw a garden waste collection bag over it to keep the continuous light rain off.

Click on any image for an enlargement.
*
2.3.17

Testing-testing 3.

*

My attempts to get the laptop, AWR, ASCOM-AWR, Stellarium and StellariumScope to work together was fraught to say the least. None of the software would recognise each other's presence. It seemed I had lost the plot during my transfer of the ASCOM-AWR driver over to the Laptop from the PC. Fortunately Tim Long, the author of the ASCOM-AWR driver, was able to help and provided a replacement driver as a zip file. Moments later I was seeing the AWR driver at work in Stellarium running virtual Gotos. It was rather surprising that AWR can still run without the motors. Rather like a very slow computer game. Presumably it thinks the motors are still connected and in their original stator position and rotation count.

Hopefully it will all still be working tomorrow when I connect up the motors on the mounting. I shall have to do some homework on the AWR's IDS manual to ensure I have the mounting set up correctly first. Unless the system knows where the telescope is pointing it might as well be blind. It could wrap the telescope around the pier into a tight knot. The AWR stepper system monitors the position of the motors to ensure it knows EXACTLY where the OTA is pointing. Crossing the Central Meridian is a problem with Goto and German Equatorial Mountings.  It wants to do a telescope flip onto the other side of the PA to avoid collisions with its own mounting. There is usually some leeway each side of the Meridian so this needs to be registered in the AWR menus.

More tomorrow:

Despite my best efforts to mess it up I managed a few slews of the mounting. Inputting the declination setting into the handset is easy. Set the saddle horizontal and enter 0° 0' 0" but make sure which end the virtual aperture should point. The RA setting requires adding 6 hours to LST.  I subtracted 6 hours first time then kept getting "Below Horizon" messages and beeps. I tried a meridian "Flip" but it lost the plot and went the "wrong way." Weights up and the saddle wrapped behind the north side of the pier. I wouldn't leave me in charge of a remotely controlled telescope just yet!

The motor direction of rotation didn't match at first either. That'll teach me to play with the Factory Menus! The way I had loaded the saddle with weights and G-cramps was fine in see-saw mode but wasn't well balanced in rotation. So at certain points the Dec wormwheel clutches would slip. Which lost my carefully input AWR pointing settings. Motor slewing only. Lessons learned: Ensure any OTA is well balanced in all planes.

The next step will be to mount the 7" folded refractor OTA and balance it carefully. Though I really should put the mounting on a taller, but much more stable, slotted angle iron, test pier first. I need a much bigger footprint before risking the OTA. Adding an OTA and matching counterweights raises the mass and the center of gravity. Causing greatly increased risk of toppling.

Lifting the mounting onto the new pier will require careful planning. I'd better remove the massive Dec shaft and saddle. Then fit them by hand after the mounting is resting safely on its new pier. Or even dismantle the mounting into its major components. It is tempting to imagine how the OTA will move around the pier but it is arguably an exercise in futility.

Important Notice: Stellarium was proving a problem with my UHD laptop screen.
I couldn't find an easy way to balance the text size with the sky and the objects shown.

Fortunately Alexander Wolf came to my rescue on my Cloudy Nights discussion on the problem.

So:  
Right click on the Stellarium desktop shortcut and select Compatibility.
Now select Properties > Disable display scaling on high DPI settings.
Click Apply, then enjoy.

Many thanks, Alexander.


*

Test-testing 2.

*

Today's tests were with the IH2 paddle using the AWR stepper drive boxes. I could not try any computer Gotos because my old Vista imaging computer doesn't have the correct software and ASCOM drivers installed. My earlier indoor planetarium tests were with W10 on a recent i7 PC. It will be interesting to see if ASCOM-AWR will play nicely with Stellarium and Vista.

I tried re-balancing the mounting and a few more slews today. The RA actually manages over 180 degrees in four minutes. Simultaneously slewing in Declination provides a much more rapid movement across the sky. Assuming of course that a change of Declination was actually desired or necessary. It would seem sensible for objects to be chosen for observation, or imaging, in logical steps across the sky. Rather than slewing 180° from East to West and then all the way back again.

Interestingly [?] when doing Goto [motor only] slews in Stellarium the mounting tended to drive both axes to begin with. Then ran only one motor once the correct declination or RA had been reached. I believe AWR claims a shortest path for Gotos. But that would presumably be using their own internal, object database. If one were actually installed. It is an extra charge on the price of the intelligent drive system to be downloaded from the AWR[Technology]uk website.

AWR Technology - INTELLIGENT DRIVE SYSTEM

Since I planned to use a computer and planetarium software for my catalogues and Gotos I saved the expense of the object database. ASCOM-AWR-Stellarium may use an alternative route from object to object. It must be remembered that an accurate Goto can save an awful lot of time-wasting searching for objects in the eyepiece or camera. Particularly when the object is small and/or dim. Light pollution must make Goto essential in some situations. Fortunately I do not have that problem. Provided I hide in my back garden away from my neighbours' runway landing light systems.

Bringing the Vista PC indoors for updating proved tiresome in the extreme. Several hours passed without progress. Avast and Stellarium both locked up the machine and crashed repeatedly. I think I will have to invest in a new PC or perhaps a laptop for telescope control and imaging. The problem is finding a white keyboard laptop with a decent sized screen. A mid price W10 PC and 24" screen makes more sense than a more expensive 15.6" laptop with a limited keyboard.

Or not. Who wants cables and screens and mice and keyboards? Not to mention providing space for all of them. I am now the proud owner of my very first laptop! 😎

Click on any image for an enlargement.

*